
MultiTech rCell 100 SMS Modem Setup for SeQent
Short answer
To use a MultiTech rCell 100 modem for SeQent SMS alarms, factory reset it, run first-time setup, then configure DHCP, SMS, cellular and Telnet access.
1. Applicable Devices
- MultiTech rCell 100 series cellular modems
2. General Note
On older modems running older firmware, the Telnet Radio Access settings page may be accessible from the side bar in the web interface. On modems running modern firmware, it can only be reached by entering the URL directly in the browser:
https://[IP_Address]/Cellular/TelnetRadioAccess
3. How to Factory Reset an rCell 100 Modem
The device can be reset in one of two ways.
3.1 Reset button
- Ensure the device is powered on.
- Locate the recessed RESET button on the device. Its location may vary by model, but it should be on the same face as the antenna connections.
- Using an appropriate tool (or paper clip), hold down the RESET button for at least 30 seconds, until the Status light remains solid.
- Allow the device to complete the factory reset process.
3.2 Resetting via the web interface
- In the side-bar menu, navigate to Administration > Save/Restore.
- In the main pane, select the Reset button under “Restore to Factory Default Configuration”, then select OK on the confirmation dialog.
- Allow the device to complete the factory reset process.
4. First-Time Setup
Use the following on initial setup, or after a factory reset.
- Ensure the modem is powered on and connected via Ethernet to a device in the
192.168.2.xrange. - In a web browser, navigate to
https://192.168.2.1. - Complete the first-time sign-in:
- Create a username for the administrator user.
- Set a password for the administrator user.
- Re-enter the password.
- Log in to the modem with the new administrator credentials.
- Complete the First-Time Setup Wizard:
- Mode: Network Router. (Select Serial Modem instead if the device will be used via a serial connection to a device rather than via network access.)
- Set the date (
MM/DD/YYYY), time (24 hr), and time zone for where the device will be deployed. - Leave Bridge set as
br0and set the provisioned IPv4 Address and appropriate Subnet Mask. - Ensure Cellular Configuration is not enabled and the APN field is blank.
- Ensure Cellular Authentication Type is set to
NONE. - Leave the default Remote Management settings.
- Leave the default Access Configuration settings.
- Leave the default Bootloader Protection settings and click Finish.
- After completing first-time setup, complete the configuration in 5. Configuring for Use with SeQent.
Default IP conflict: The modem’s default IP is
192.168.2.1. Ensure the device you connect from has a unique IP. If you are connecting the modem to a router that uses192.168.2.1, connect the modem directly to a PC instead.
Note: Some setup wizard pages may differ slightly in Serial Modem mode.
5. Configuring for Use with SeQent
The following settings must be in place for proper functionality and delivery of alarm messages via SMS.
5.1 DHCP Configuration
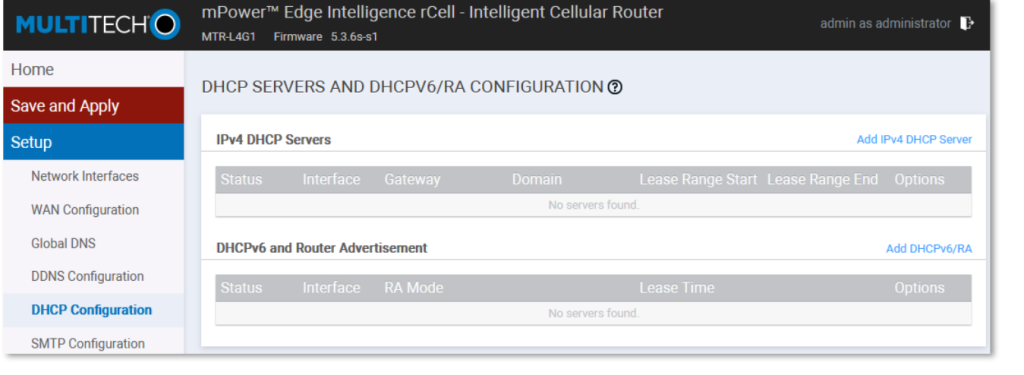
- Navigate to Setup > DHCP Configuration.
- By default, there is one entry under IPv4 DHCP Servers and one under DHCPv6 and Router Advertisement. Delete all entries on this page using the trash-can icon.
Figure 1 – DHCP Configuration Page
5.2 SMS Configuration
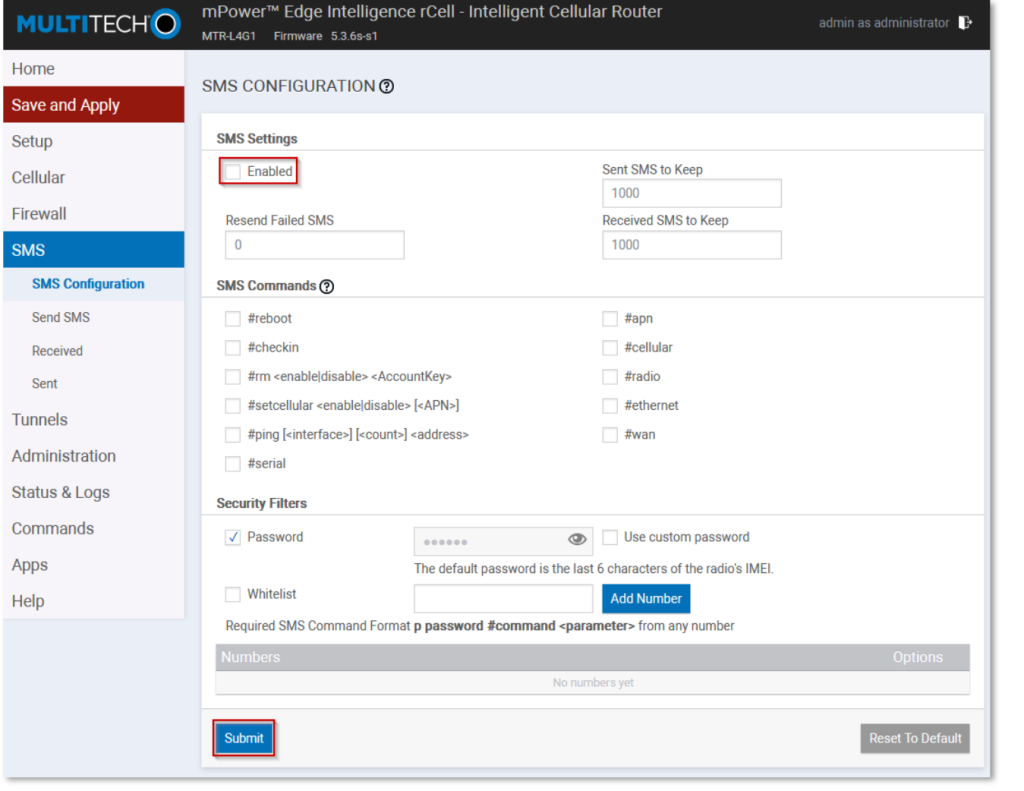
- Navigate to SMS > SMS Configuration.
- Ensure SMS is not enabled.
- If you make a change on this page, select Submit at the bottom of the page.
Figure 2 – SMS Configuration Page
5.3 Cellular Configuration
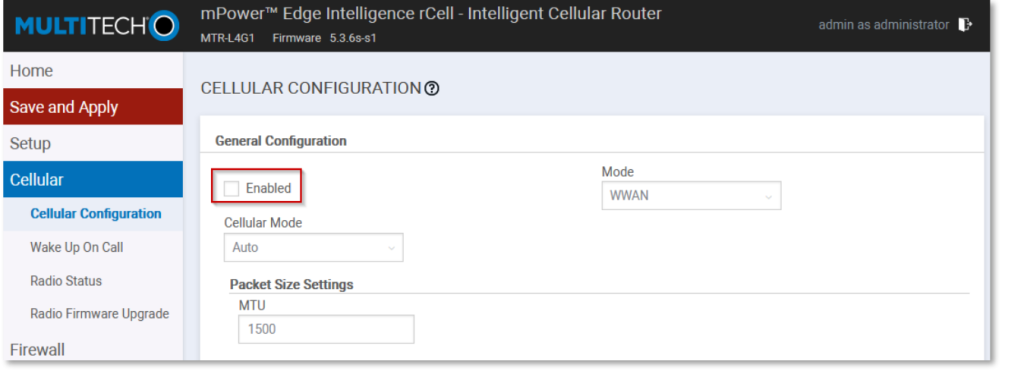
- Navigate to Cellular > Cellular Configuration.
- Ensure Cellular is not enabled.
- If you make a change on this page, select Submit at the bottom of the page.
Figure 3 – Cellular Configuration Page
5.4 Telnet Radio Access
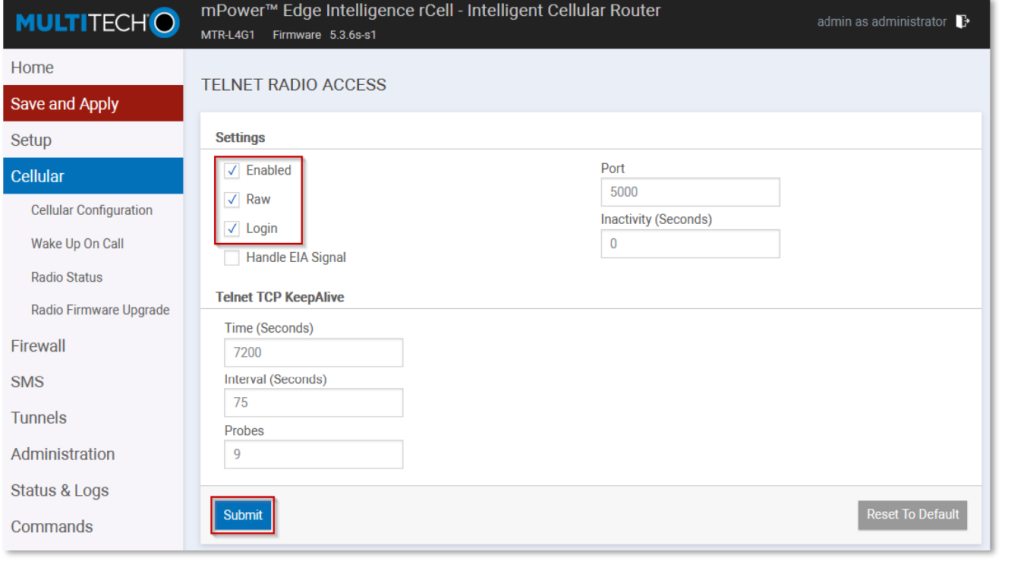
- Using the browser’s URL field, navigate to Cellular > Telnet Radio Access:
https://[IP_Address]/cellular/telnetradioaccess - Ensure Telnet Radio Access is enabled.
- Ensure Raw is enabled.
- Ensure Login is enabled.
- Select Submit at the bottom of the page.
Figure 4 – Telnet Radio Access Page
5.5 Save and apply
- Select Save and Apply at the top of the side bar.
- Select OK on the confirmation pop-up.
- Select OK to apply the changes and reboot the device.
After reboot: The device must be accessed using the newly set IP address.
Looking for more?
Licensed customers can log in to the Customer Care Portal for detailed troubleshooting guides, release notes, and product downloads.


